To
discover the content of this blog visit the "summary" page.
Introduction
First of all I would like to
apologize for my imperfect English, please be indulgent.I decided to dedicate my blog mainly to the techniques of digital art in order to render a little that the web have given me in this area. But the Anglophone community of internet has also helped me a lot, so I thought that enlarging my audience to this community would be a just reward.
Here is the photo of a
young woman (I do not know the name) found on
the web in Christian LAY Tunisia catalog that I would
like to use for making a tutorial “draw an eye” with the software Adobe Illustrator (CS5).

Eyes and eyebrows
Drawing eyes and eyebrows are plots often difficult for
rendering the authenticity of the look. You can
see the eyes in this picture which include
the following:
·
The eye with the cornea,
iris and pupil· The light reflections and shadows
· The eyelid
· Eyelashes
· Eyebrows
The eye
My approach to the
eyes is always the same. I start by
drawing the cornea that I filled
with a variable linear gradient as
appropriate (7 colors here taken with the
pipette (I) in the subject's eye, angle = 12.50 ° and
feather 2 pixels):
·
Location
0%, RGB = 165, 88, 59· Location 6%, RGB = 180, 109, 82 (Distribution: 50-50%)
· Location 13%, RGB = 189, 188, 183 (Distribution: 50-50%)
· Location 20%, RGB = 227, 227, 224 (Distribution: 50-50%)
· Location 41%, RGB = 227, 227, 224 (Distribution: 50-50%)
· Location 85%, RGB = 172, 174, 174 (Distribution: 78-22%)
· Location 100%, RGB = 93, 33, 17 (Distribution: 70-30%)

Read the post "Notation for color gradients"
for more information.
Then I draw the iris using the
tool "ellipse" that I filled with a
radial gradient color (6 colors here taken with the
pipette (I) in the subject's eye, feather 4 pixels, angle 0 °):
·
Location
20%, RGB = 15, 21, 19
·
Location
39%, RGB = 47, 84, 98 (Distribution: 37-63%)
·
Location
51%, RGB = 95, 139, 150 (Distribution: 50-50%)
·
Location
75%, RGB = 181, 199, 203 (Distribution: 50-50%)
·
Location
95%, RGB = 47, 84, 98 (Distribution: 75-25%)
·
Location
100%, RGB = 15, 21, 19 (Distribution: 50-50%)

You have probably noticed that the top of the iris is darker near the eyelid. That is why I duplicate the iris (over the first) in order to fill the second with transparency "Darken" and a linear gradient of 3 colors (angle = -86 °, feather 4 pixels):
·
Location
26%, RGB = 15, 21, 19· Location 43%, RGB = 95, 139, 150 (Distribution: 63,5-36,5%)
· Location 66%, RGB = 227, 227, 224 (Distribution: 31,5-68,5%)

Then I draw the pupil circle black
color (RGB = 0, 0, 0) and 4 pixels feather that I position after
disabling display (Ctrl-click on the eye layer).

Then we have to resize the iris within the cornea.
For this, I duplicate the cornea and the two are selected together (iris and
cornea) and I use the "pathfinder"
tool option "crop". This provides a good size of the iris into the cornea (you can also use a clipping mask).

We also resize the dark iris path the same
way.
The light reflections
and shadows
At this stage, the eye is too perfectly clear and we must darken the cornea as in reality by the effects of light and shadow. For this, we duplicate the path cornea to fill it with a linear gradient of 2 colors (angle = 93 °, feather 2 pixels) with transparency "Darken":
·
Location
0%, RGB = 252, 252, 252· Location 95%, RGB = 0, 0, 0 (Distribution: 85-15%)

Then I darken the bottom of the cornea by duplicating it in order to fill it with a linear gradient of 2 colors (angle = 93 °, feather 2 pixels) with transparency "Darken":
·
Location
0%, RGB = 0, 0, 0· Location 100%, RGB = 252, 252, 252 (Distribution: 17-83%)

The corner of the
eye (bottom right) is
slightly red and I use a path
filled with color RGB = 180, 109, 82 Gaussian
Blur 4.5 pixels as below:

The corner of the eye (top right) is slightly shaded blue and I use a path filled with color RGB = 165, 173, 176 Gaussian Blur 3.5 pixels with transparency "Darken" as below:

You'll also observe that the iris is filled with grains of dark or light colors. To make these disparities I use several techniques, but most often it is the one described below.
I creates two blends with a curved line and optional gradient = 12 steps, one inside and one outside, with small ovals filled with gradient’s values the same as iris (see above) but here linear, feather 2 pixels:
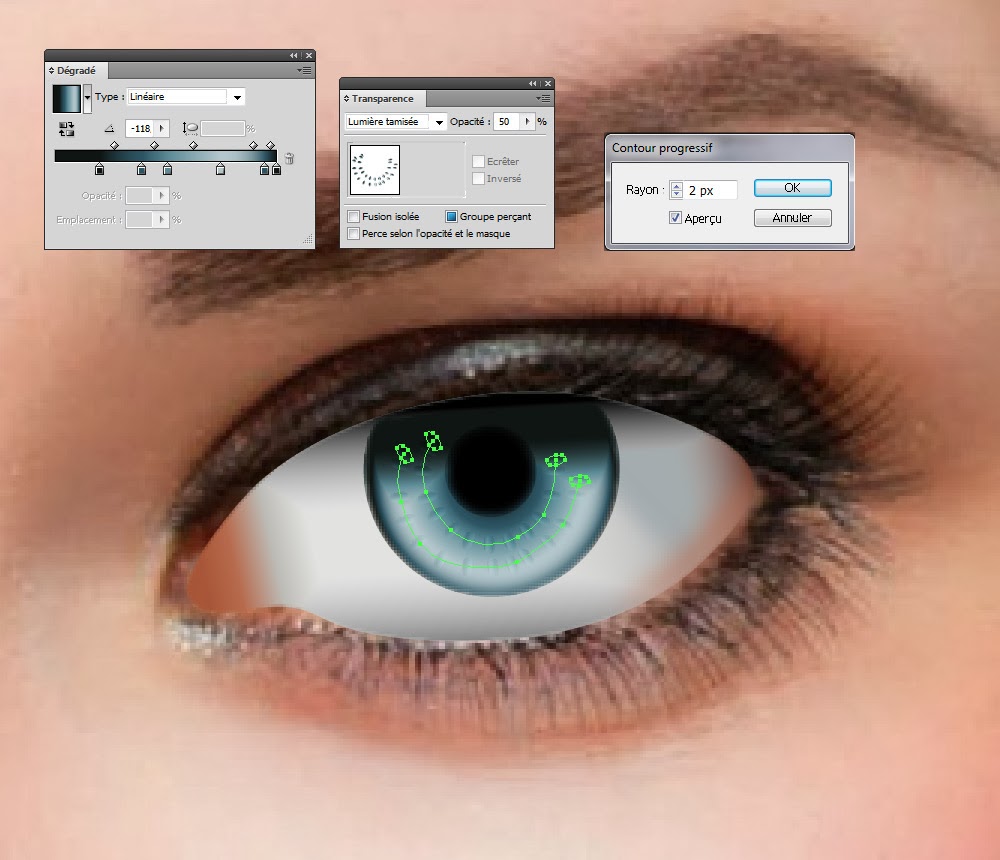
Blends are with transparency "Soft Light" and opacity 50% as shown in
close-up below:

For the light aspects we can
discern 3 light areas.
The first area under the pupil is a path
filled with light color (RGB = 240, 237, 237), Gaussian
Blur 0.5 pixel and
Transparency "Hard Light" (see below):
Then the
second area is on the pupil, 2 paths clear color (RGB = 240, 237, 237)
and 1.6 pixel Gaussian
Blur:

Finally, the third area is on the
cornea, a path of light
color (RGB = 241, 241, 242), opacity 25% and 1.2 pixel Gaussian
Blur:

The eyelid
Drawing the eyelid begins
with a path for the darkened
area around the eye (to be
placed behind the cornea), Gaussian
blur of 2.5 pixels and with
a linear gradient of 2 colors
(angle = -81.5 °), as below:
·
Location
26%, RGB = 132, 83, 68· Location 100%, RGB = 210, 145, 124 (Distribution: 21-79%)

The makeup of the
upper edge of the eye is a path (to be
placed behind the cornea) dark color (RGB = 48, 34, 25) and Gaussian
Blur 3 pixels, as shown
below:

The drawing of the eyelid continues with 2 paths as "Charcoal - tapered" 0.5 pt. (from standard brush library), dark color (RGB = 26, 15, 8) and 0.5 pixel Gaussian
blur as below:

The shadow under the
eye is a blend consisting
of two paths:
The first path is a linear gradient of 3 colors (angle = 180 °), feather 3 pixels as shown
below:
·
Location
0%, RGB = 89, 48, 38· Location 43%, RGB = 132, 83, 68 (Distribution: 50-50%)
· Location 100%, RGB = 210, 145, 124 (Distribution: 40-60%)

The second
path is filled with a linear gradient of 2 colors (angle = -128 °), feather 6 pixels, as shown
below:
·
Location
0%, RGB = 163, 103, 84· Location 100%, RGB = 242, 193, 174 (Distribution: 36-64%)

And finally the light
reflections on the makeup of the
edge of the eye are 2 paths of light
color (RGB = 227, 227, 224) as shown
below:
The first path with a
Gaussian blur of 3.5 pixels:
The second with a brush "Charcoal -
Thin" 0.75 pt. and Gaussian
blur of 2.5 pixels:

The reflection on the eyelid is materialized by a path filled with color (RGB = 226, 172, 154) and brush "Pencil - Feather" size 1 pt. and a Gaussian blur of 3.5 pixels:

The outline on the bottom of the eye is a path of color (RGB = 89, 48, 38) as "Pencil - Thick" size 2 pts and feather 2 pixels:

A second reflection on the lid is made with a path filled with color (RGB = 159, 99, 75) and brush "Pencil - Feather" size 1 pt. and 3.5 of a Gaussian blur pixels:

Finally, the reflection on the bottom of the eyelid is a path of color (RGB = 227, 227, 224) and brush "Pencil - Thick" size 1 pt. and a Gaussian blur of 2.5 pixels:

This completes the design of the eye (cornea, iris, pupil, eyelid), it remains to draw the eyelashes and eyebrows.
The lashes
The bottom lashes are made with a single line (size 1 pt.) with the profile of width 4 (see below).

The lines are then decomposed (Object-Expand
Appearance) in order to fill them with a linear gradient of 3 colors (angle = 0 ° and angle varies according to the desired effect for each of the eyelashes):
·
Location
37%, RGB = 48, 34, 25· Location 86%, RGB = 139, 81, 67 (Distribution: 44-56%)
· Location 100%, RGB = 226, 172, 154 (Distribution: 50-50%)

The eyelashes at the bottom of eyelid are arranged and adapted in size, shape and gradient and then placed in 75% opacity with a Gaussian blur of 0.5 pixels.

Upper lids of the eyelid are made partly using simple lines (size 2 pts.) with profile width 5 color (RGB = 44, 21, 17).

For another part eyelashes are simple lines of color (RGB = 44, 21, 17) and brush "Pencil - Feather" size 1 pt. 50% opacity.

For the others finally eyelashes are simple lines color (RGB = 44, 21, 17) and brush "Pencil - Feather" size 0.75 pt. 100% opacity.

All the upper lashes are placed Transparency "Darken" and opacity to 60%.

The eyebrows
For eyebrows, I begin by defining the area of maximum density and materialized by a path filled with color RGB = 138, 86, 65, transparency "Darken" and 1.5 pixel Gaussian blur, as below:

Then I created a new symbol from a line (size 1 pt.) width profile 5. I was able to create a set of symbols with the "Symbol
sprayer" tool. I then decomposed (Object-Expand Appearance) the set in order to color them. First portion become
shapes of color RGB = 128, 78, 50 as described below:

A second
part is filled with color RVB = 83, 47, 34 as described below:

A third
part is made with sets of symbols as described below:

And here is the overall result:

Below the eye is integrated with the rest of the face drawn from the original model:

And here the whole drawing face, nose, ears, hair and neck.

Aucun commentaire:
Enregistrer un commentaire